Connection issue?Troubleshooting reference included
Before you start
Have the right details within reach.
Choose your email app below. You will need the credentials and server settings issued for your mailbox before following a guide.
01
Account checklist
What you need
Email addressname@company.com
Account usernameOften your full email address
Account passwordCase-sensitive
Incoming serverPOP or IMAP details
Outgoing serverSMTP details
02
Important
Use your issued settings
The names, ports and security options shown in the guides are examples from different mail systems. They are not universal defaults. Use encryption for incoming and outgoing mail, never select “None”, and stop to confirm the issued settings if a secure connection fails.
!
Match every field to the information supplied by Infoarch or your email administrator. If multifactor authentication is enabled, use the official sign-in flow or an administrator-issued app password; never disable MFA to make setup work.
Tap any screenshot to enlarge it. Screens and menu names may vary by software or operating-system version.
Legacy Windows guide
Outlook Express
Configure a POP or IMAP mailbox in Outlook Express, then enable outgoing mail authentication.
Legacy9 illustrated steps
Legacy software
This app is unsupported and may not provide modern authentication or encryption. Do not connect it to a live mailbox; retain this guide only for isolated archive access and migrate to a supported client.
Before you beginAccount details checklist
You should have the following information available:
Use your mailbox settingsThe values below are provider-neutral examples. Use only the server names, encrypted ports and security options issued by Infoarch or your email administrator; never select “None”.
Your...
Example...
Display Name
Example User
Email address
user@example.com
Email account username
Issued username
Email account password
Not shown
POP3 Server
pop.example.com
POP3 Port
Use the encrypted port issued for this mailbox
SMTP Server
smtp.example.com
SMTP Port
Use the encrypted port issued for this mailbox
IMAP Server
imap.example.com
IMAP Port
Use the encrypted port issued for this mailbox
Configure Outlook Express to Retrieve Your Emails
Step 1:
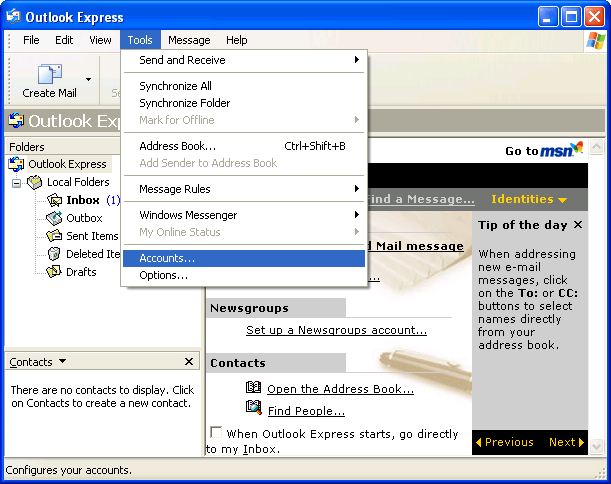
Launch Outlook Express, select 'Tools' from the menu, then click 'Accounts...'
Step 2:
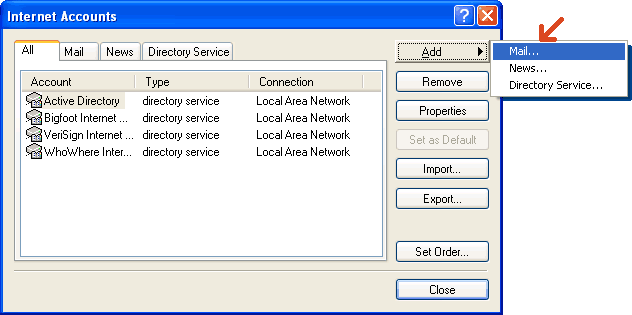
Create a new email account by clicking on the 'Add >' button, then select 'Mail...'
Step 3:
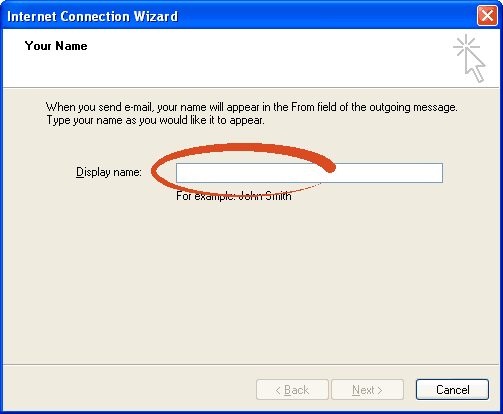
Type in your name in the 'Display name' text box, then click the 'Next >' button
Note: When the recipient receives email sent from this account, it will show that the email is sent from 'Display Name'. Type your name as you would like it to appear.
Step 4:
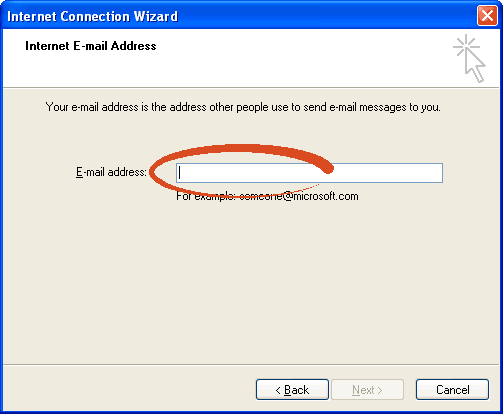
Type in your return email address (as given to you by your administrator) in the 'E-mail address' text box, then click the 'Next >' button
Note: When the recipient reply to your email or want to send a new email to you, this is the address they should use.
Step 5:
Using POP3 or IMAP Server
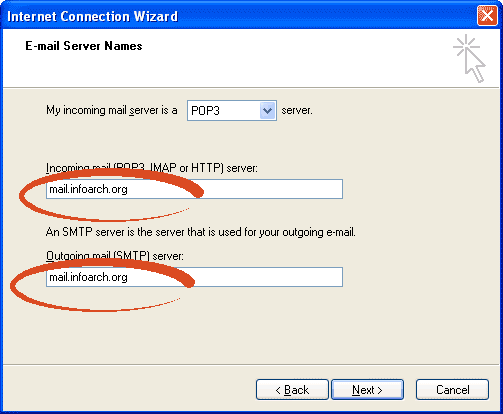
Make sure 'POP3' is selected ('IMAP' if you're using IMAP server) as the incoming mail server, and type in your POP3 server name (IMAP server name if using IMAP server) in the 'Incoming mail (POP3, IMAP or HTTP) server:' text box
POP3 stands for Post Office Protocol, incoming emails to you will be waiting at the POP3 server.
IMAP stands for Internet Message Access Protocol, you can leave incoming emails at the IMAP server.
SMTP stands for Simple Mail Transfer Protocol, your outgoing emails will be sent by the SMTP server.
Step 6:
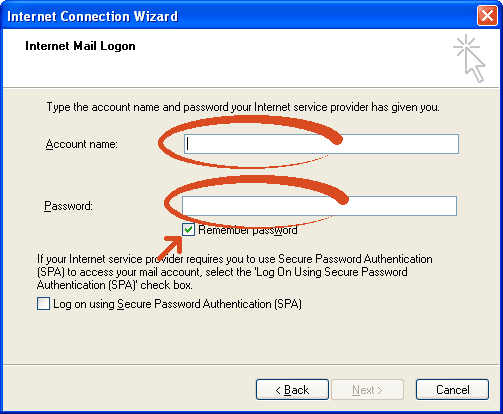
Type the issued account name and password. Because Outlook Express is unsupported, do not store live mailbox credentials in it. For isolated archive access only, save a password solely on a private, fully encrypted and access-controlled device. Click 'Next >' to continue.
Your email account may not necessarily be the same as your email address or display name.
... and you are done. You can now receive emails!
You may continue to Step 7 if you also want to use Outlook Express to send out your emails.
Configure Outlook Express to Send Your Emails
Step 7:
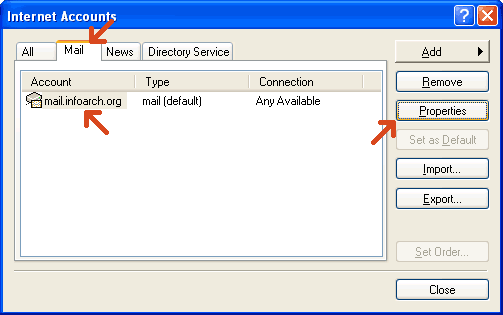
Again, open your account setting dialog box by following Step 1, then click on the 'Mail' tab to see the list of your email accounts. Click on the email account you just created, then 'Properties'
Make sure you have selected the mail account you want to modify by clicking on it first.
Step 8:
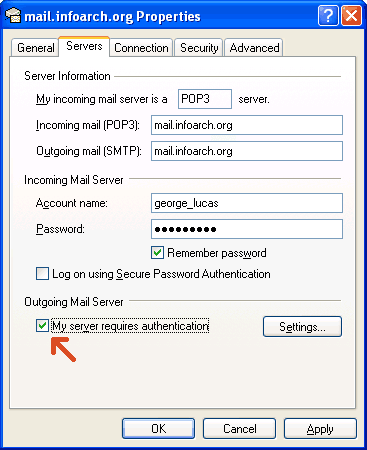
Click the 'Servers' tab, then check the 'My server requires authentication' checkbox under Outgoing Mail Server. Click 'Apply'
Step 9:
Click the 'Advanced' tab, enter only the issued encrypted SMTP and POP3 ports, and enable the matching encrypted connection options. Do not select “None”. If this app cannot use the required encryption, stop and migrate to a supported client.
... and you can now send emails!
Legacy desktop guide
Microsoft Outlook XP
Add a POP or IMAP mailbox in Outlook XP and review the outgoing server settings.
Legacy7 illustrated steps
Legacy software
This app is unsupported and may not provide modern authentication or encryption. Do not connect it to a live mailbox; retain this guide only for isolated archive access and migrate to a supported client.
Before you beginAccount details checklist
You should have the following information available:
Use your mailbox settingsThe values below are provider-neutral examples. Use only the server names, encrypted ports and security options issued by Infoarch or your email administrator; never select “None”.
Your...
Example...
Display Name
Example User
Email address
user@example.com
Email account username
Issued username
Email account password
Not shown
POP3 Server
pop.example.com
POP3 Port
Use the encrypted port issued for this mailbox
SMTP Server
smtp.example.com
SMTP Port
Use the encrypted port issued for this mailbox
IMAP Server
imap.example.com
IMAP Port
Use the encrypted port issued for this mailbox
Configure Microsoft Outlook to Retrieve Your Emails
Step 1:
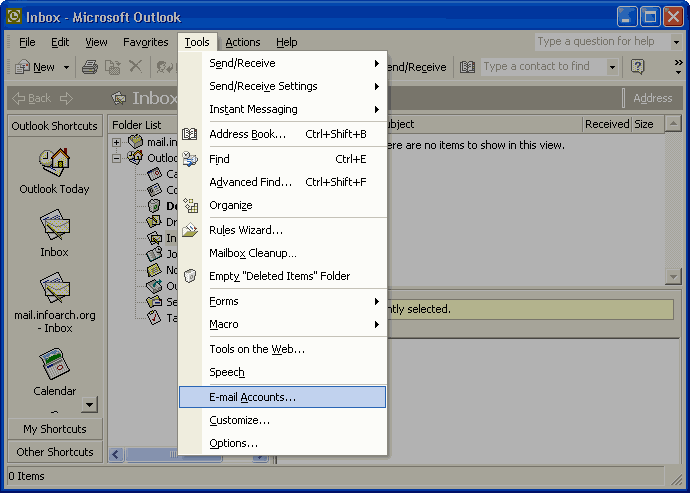
Launch Microsoft Outlook XP, select 'Tools' from the menu, then click 'E-mail Accounts...'
Step 2:
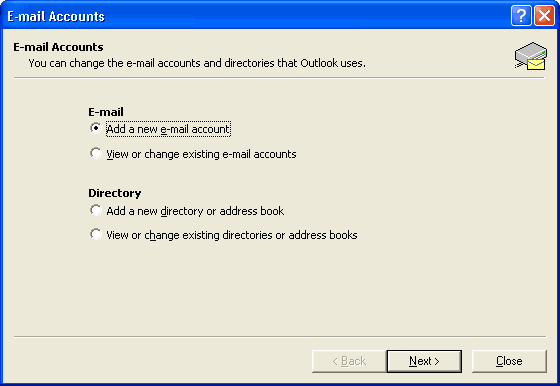
Create a new email account by clicking on the 'Add a new e-mail account' radio button, then select 'Next >'
Continue to Step 3 if you are creating / adding a new e-mail account. If you already have an email account and are no longer using your old emails, you can select the 'View or change existing e-mail accounts' radio checkbox instead, which will bring up a dialog box to select the e-mail account you want to view or modify.
Step 3:
Using POP3 or IMAP Server
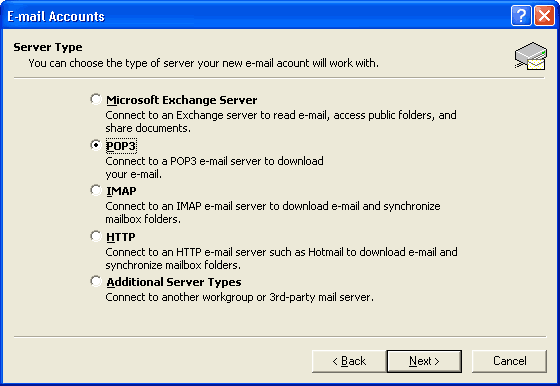
Select 'POP3' ('IMAP' if you're using IMAP Server) and click 'Next >'
Step 4:
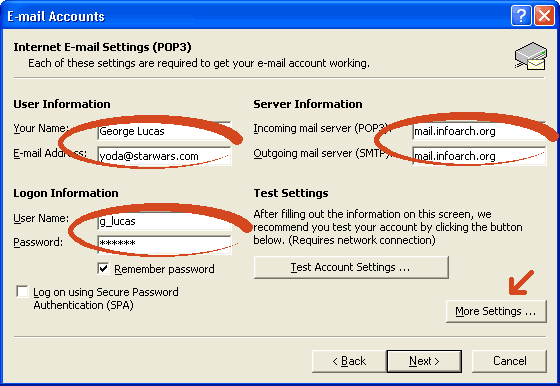
(a) Type in your name in the 'Your Name' text box, then your email address in the 'E-mail Address' checkbox
Type in your POP3 server name (IMAP server name if you're using IMAP Server) in the 'Incoming mail server (POP3 or IMAP or HTTP):' text box
(c) Type in your SMTP server name in the 'Outgoing mail server (SMTP):' text box, then click 'Next >'
(d) Type in your user name in the 'User Name' text box, and your account password in the 'Password' text box.
(e) Because Outlook XP is unsupported, do not store live mailbox credentials in it. For isolated archive access only, save a password solely on a private, fully encrypted and access-controlled device.
(f) Click 'More Settings...' to configure your email account further
When the recipient receives email sent from this account, it will show that the email is sent from 'Your Name' and 'E-mail Address'. Type your name as you would like it to appear. Note that your email account may not necessarily be the same as your email address or display name.
Step 5:
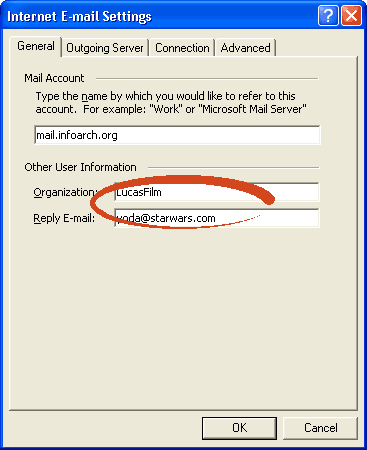
This step is actually optional; you can provide additional information about yourself by providing your organization name and the ACTUAL reply email address. This email address is the address the recipient email client will actually use to reply to your email.
Note: 'User E-mail Address' is what the recipient see, 'Reply E-mail' is what the recipient's email client uses to reply to you.
... and you are done. You can now receive emails!
You may continue to Step 6 if you also want to use Microsoft Outlook to send out your emails.
Configure Microsoft Outlook to Send Your Emails
Step 6:
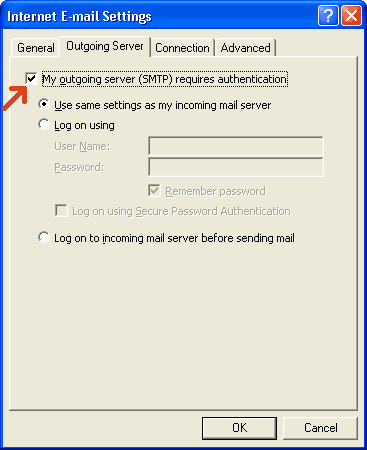
Click the 'Outgoing Server' tab, then check the 'My server requires authentication' checkbox under Outgoing Mail Server. Then click the 'Advanced' tab.
Step 7:
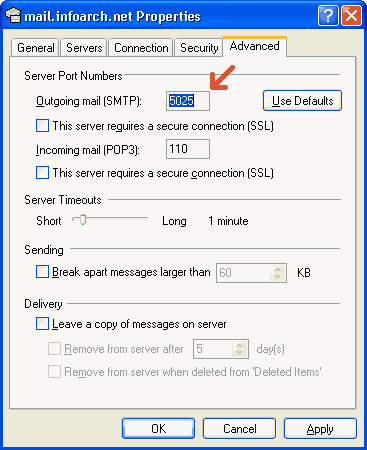
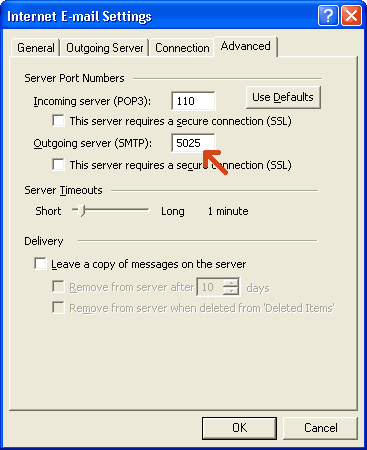
Click the 'Advanced' tab, enter only the issued encrypted SMTP and POP3 ports, and enable the matching encrypted connection options. Do not select “None”. If this app cannot use the required encryption, stop and migrate to a supported client.
... and you can now send emails!
Desktop guide
Outlook Classic
Set up or update a POP or IMAP account in classic Outlook, including Microsoft 365, 2019 and 2022 desktop versions.
Popular6 steps · 5 screenshots
Settings vary by mailbox
Use the exact server names, ports, encryption options and credentials issued for your account. Screenshot values are illustrative.
Before you beginAccount details checklist
You should have the following information available:
Use your mailbox settingsThe values below are provider-neutral examples. Use only the server names, encrypted ports and security options issued by Infoarch or your email administrator; never select “None”.
Your...
Example...
Display Name
Example User
Email address
user@example.com
Email account username
Issued username
Email account password
Not shown
POP3 Server
pop.example.com
POP3 Port
Use the encrypted port issued for this mailbox
SMTP Server
smtp.example.com
SMTP Port
Use the encrypted port issued for this mailbox
IMAP Server
imap.example.com
IMAP Port
Use the encrypted port issued for this mailbox
Configure (Setup) Microsoft Outlook 365 Account or Microsoft Outlook 2019 Account
Step 1:
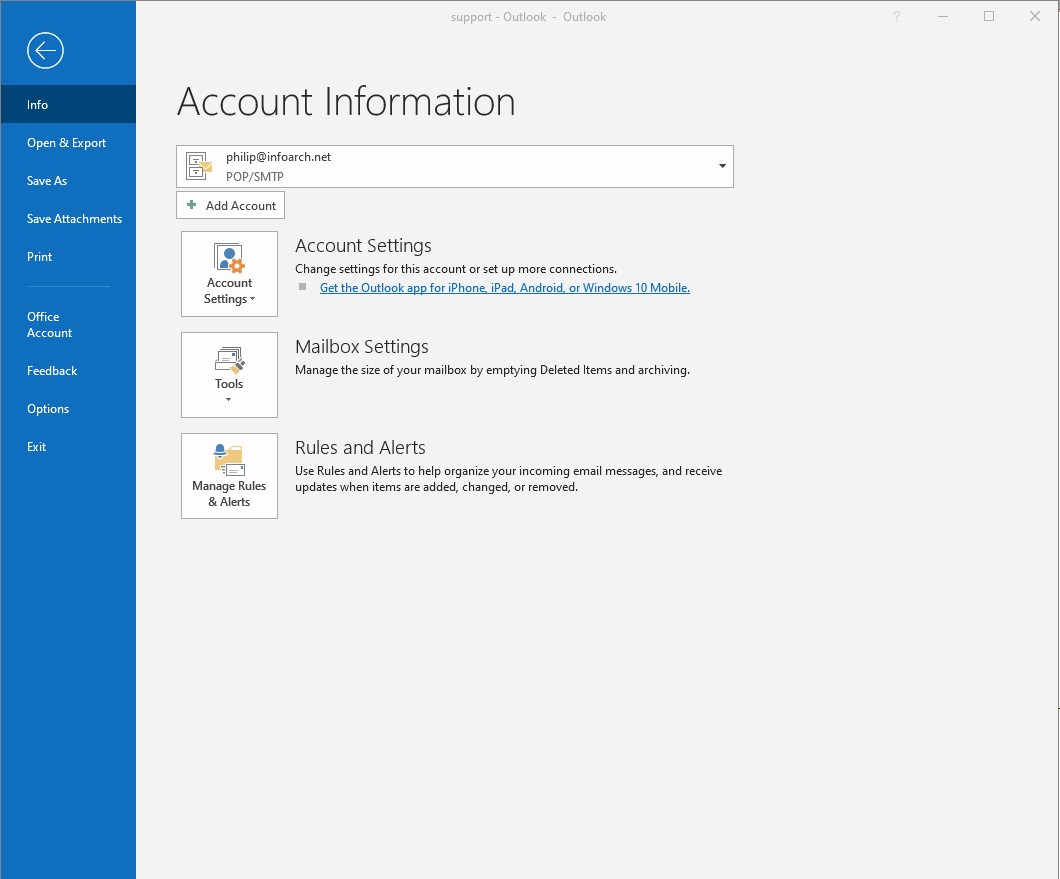
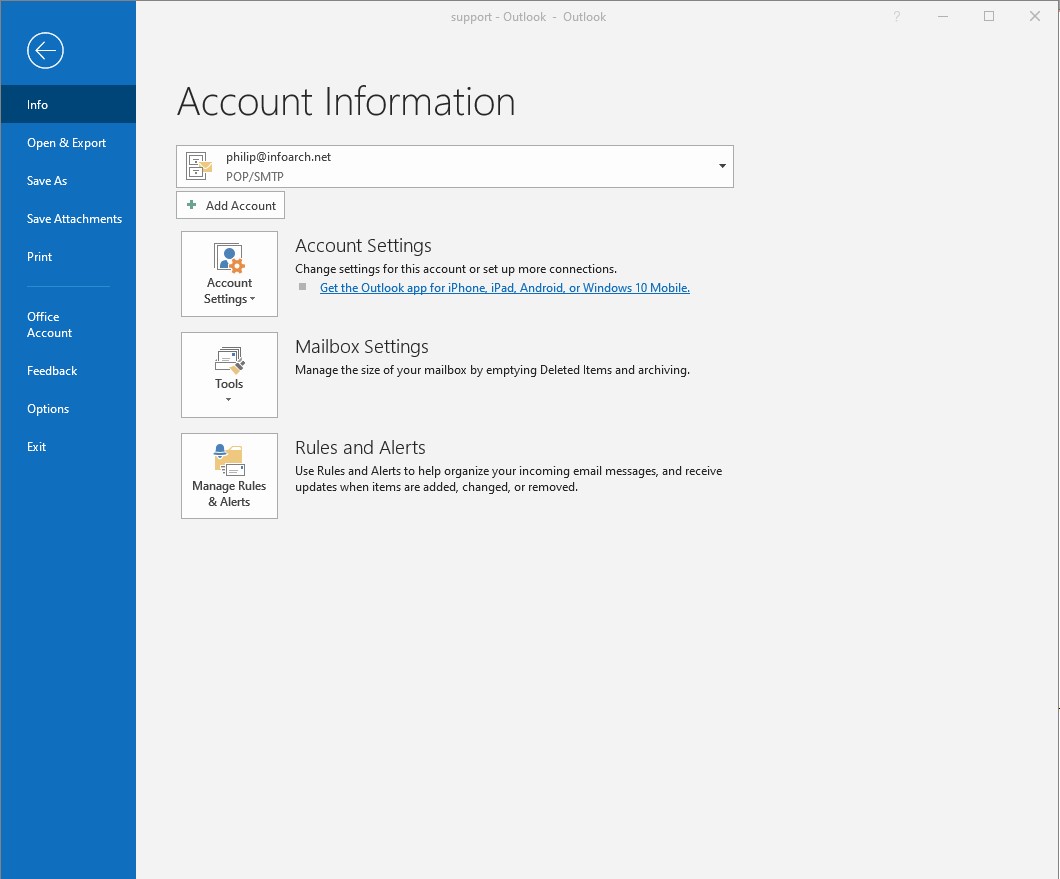
Launch Microsoft Outlook, select 'File' from the menu, then click the '+ Add Account' button
Step 2:
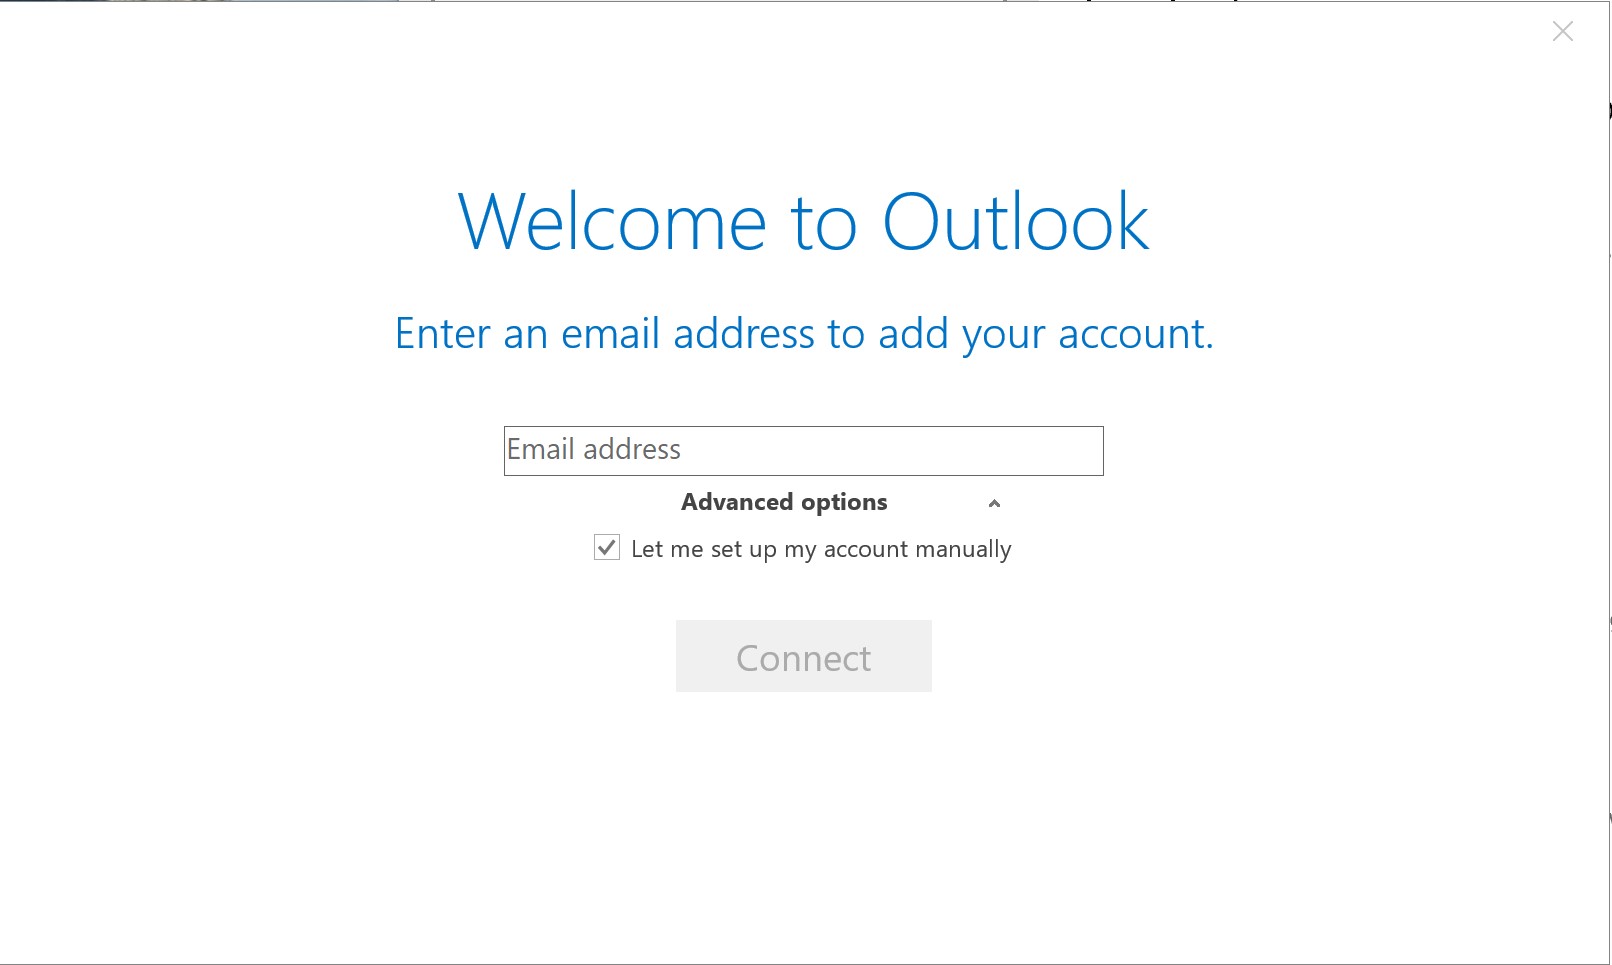
Type in your full email address, expand the "Advanced Options" drop down, tick the "Let me setup my account manually" checkbox, then click the 'Connect' button
Step 3:
Using POP3 or IMAP Server
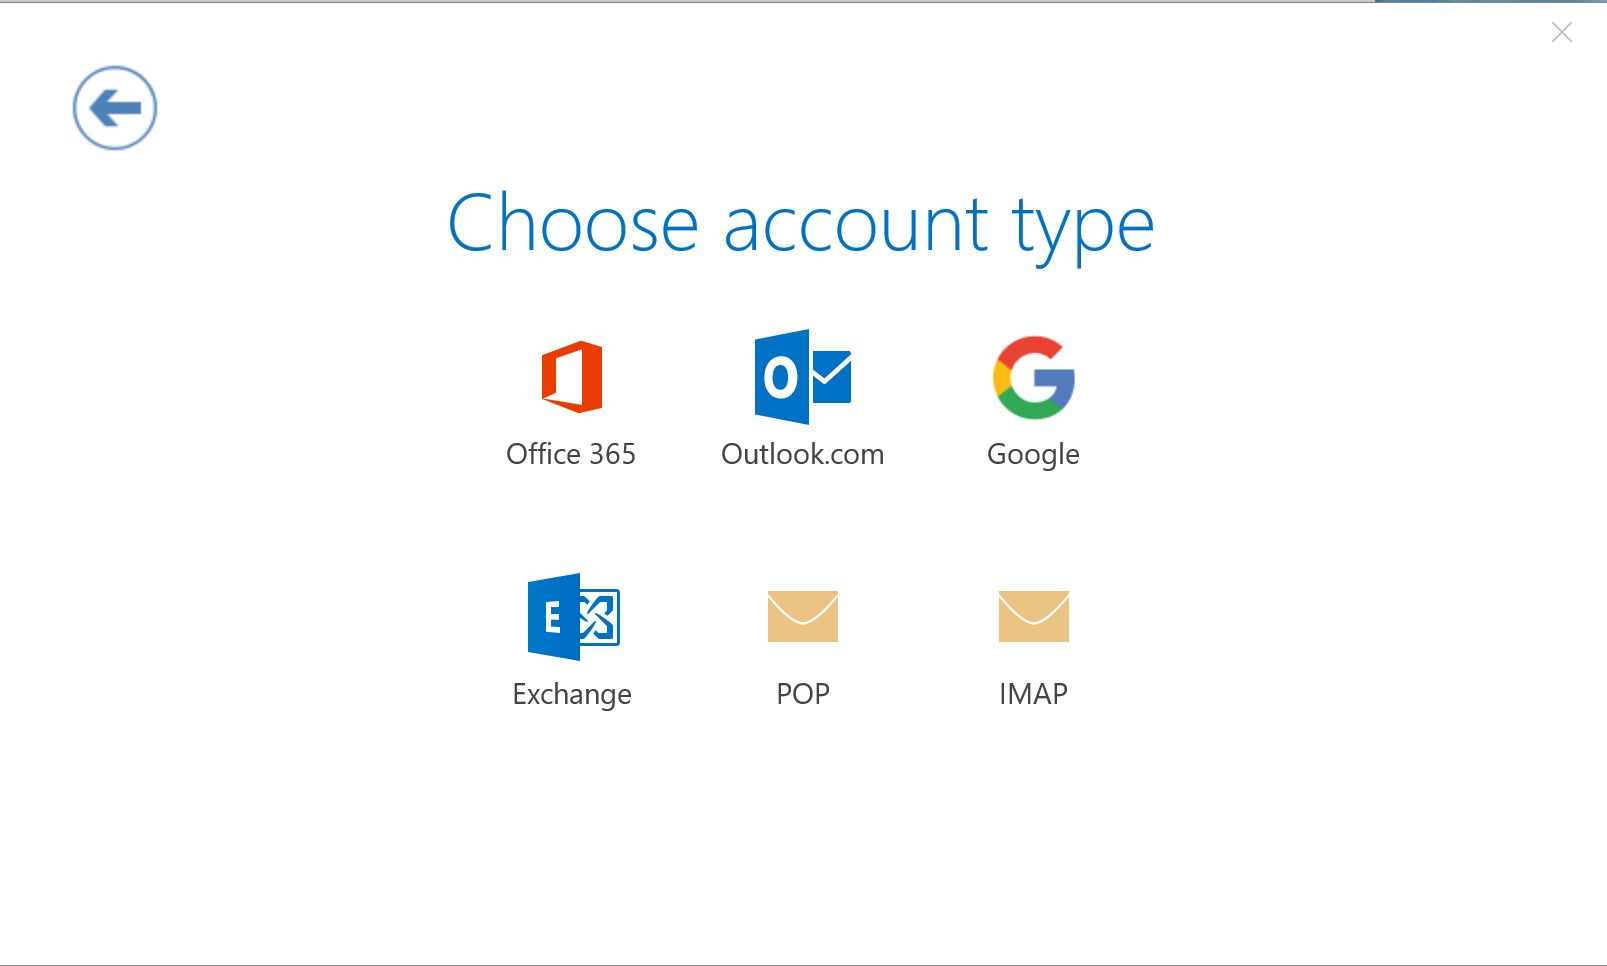
Select 'POP3' ('IMAP' if you're using IMAP Server)
POP3 stands for Post Office Protocol, incoming emails to you will be waiting at the POP3 server, this is how Microsoft Outlook will communicate with the server. Some ISP allows you to use IMAP, check with your ISP to see if that is the case. IMAP stands for Internet Message Access Protocol, you can leave incoming emails at the IMAP server
Step 4:
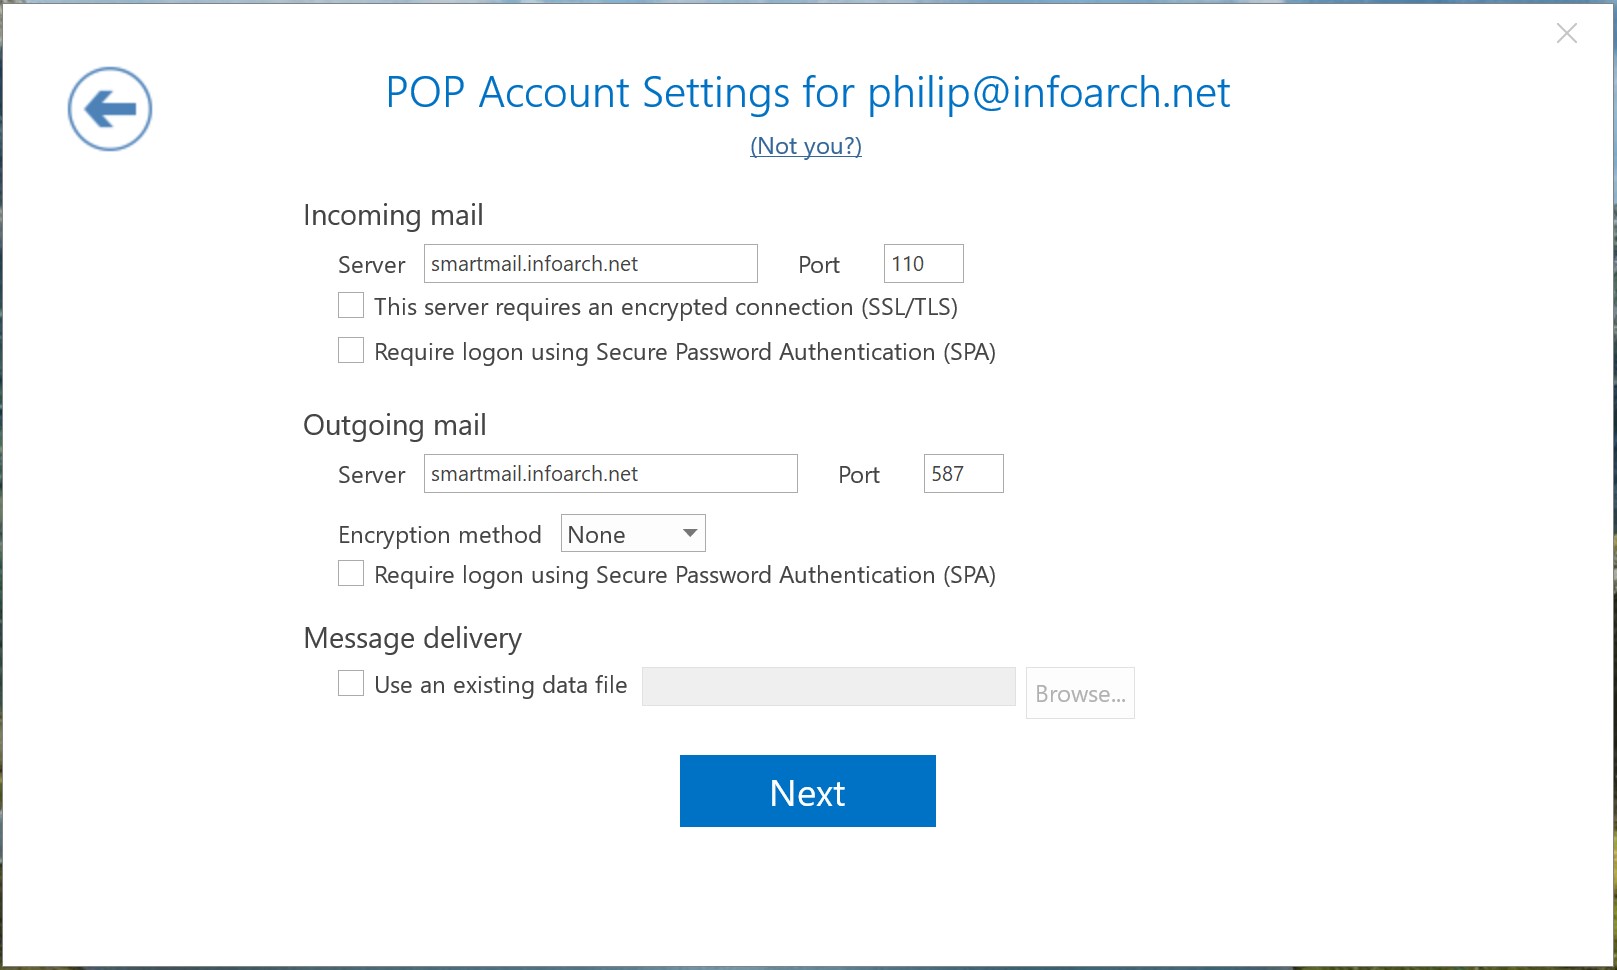
Using POP3 or IMAP Server
(a) Type in your name in the 'Your Name' text box, then your email address in the 'E-mail Address' checkbox
(b) Enter the issued incoming server, encrypted port and matching security option. Do not select “None”.
(c) Enter the issued SMTP server, encrypted port and matching security option, then click 'Next >'. Do not select “None”.
(d) Type in your account password in the 'Password' text box.
Change Existing Microsoft Outlook 365 Account or Microsoft Outlook 2019 Account Settings
Step 5:
From Outlook, select the "File" menu item,. click the "Account Settings" button, then select the "Account Settings..." option
Step 6:
Select the account name you would like to change, then click the "Repair..." option
... continue to Step 2 and click the "Repair" button.
Desktop guide
New Outlook
Connect a POP or IMAP mailbox in New Outlook using the settings supplied for your account.
Cloud sync5 configuration screens
Settings vary by mailbox
Use the exact server names, ports, encryption options and credentials issued for your account. Screenshot values are illustrative.
Before using New Outlook
New Outlook may synchronise supported third-party mailboxes through Microsoft Cloud. Confirm organisational approval, data-residency requirements and permission to sync through Microsoft Cloud before entering credentials or continuing. Review Microsoft’s account-sync guidance.
Encryption required
Use only the issued encrypted ports and connection types. Never select “None”; if encryption fails, stop and contact your administrator.
Before you beginAccount details checklist
You should have the following information available:
Use your mailbox settingsThe values below are provider-neutral examples. Use only the server names, encrypted ports and security options issued by Infoarch or your email administrator; never select “None”.
Your...
Example...
Display Name
Example User
Email address
user@example.com
Email account username
Issued username
Email account password
Not shown
POP3 Server
pop.example.com
POP3 Port
Use the encrypted port issued for this mailbox
SMTP Server
smtp.example.com
SMTP Port
Use the encrypted port issued for this mailbox
IMAP Server
imap.example.com
IMAP Port
Use the encrypted port issued for this mailbox
Configure Microsoft Outlook (New)
Step 1:
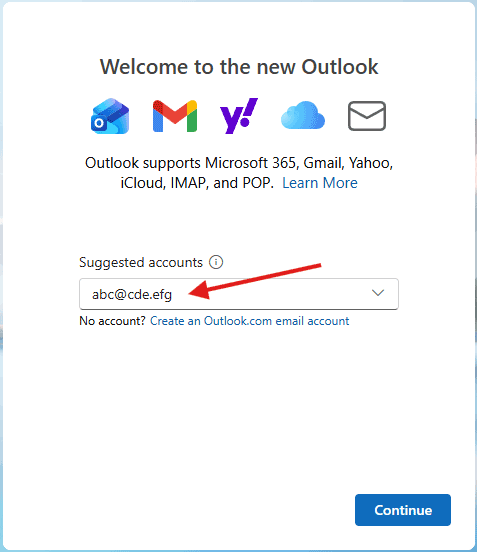
Key in the email address and click the 'Continue' button
Step 2:
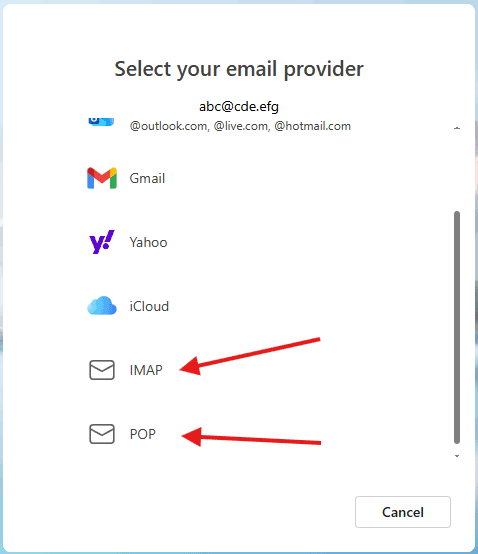
Scroll down to select IMAP or POP
Step 3:
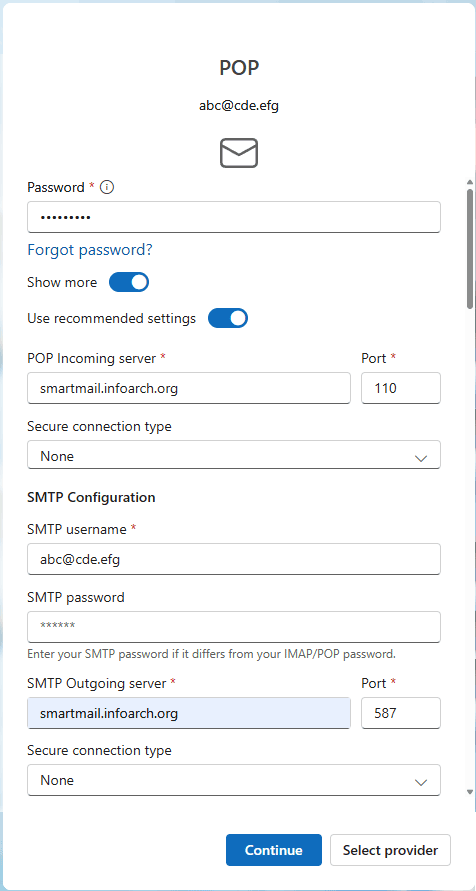
For POP
1. Key in the password
2. Key in POP Server Name as the POP Incoming server
3. Use the encrypted POP port issued for this mailbox
4. Select the issued encrypted POP connection type; never select “None”
5. Key in the email address for SMTP username
6. Key in the password again
7. Key in the SMTP Server Name as the SMTP Outgoing server
8. Select the issued encrypted SMTP connection type; never select “None”
After confirming the issued encrypted settings and organisational approval, click “Continue” to sync with Microsoft Cloud.
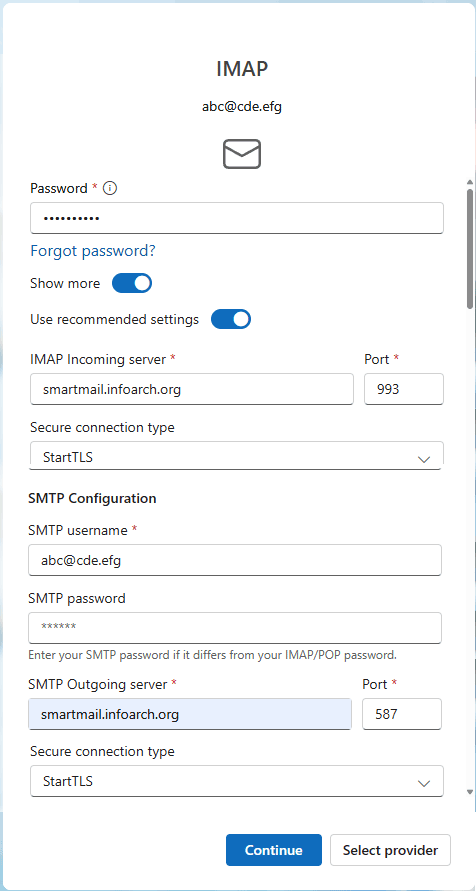
For IMAP
1. Key in the password
2. Key in the IMAP Server Name as the IMAP Incoming server
3. Select the encrypted IMAP connection type issued for this mailbox; never select “None”
4. Key in the email address for SMTP username
5. Key in the password again
6. Key in SMTP Server Name as the SMTP Outgoing server
7. Select the encrypted SMTP connection type issued for this mailbox; never select “None”
After confirming the issued encrypted settings and organisational approval, click “Continue” to sync with Microsoft Cloud.
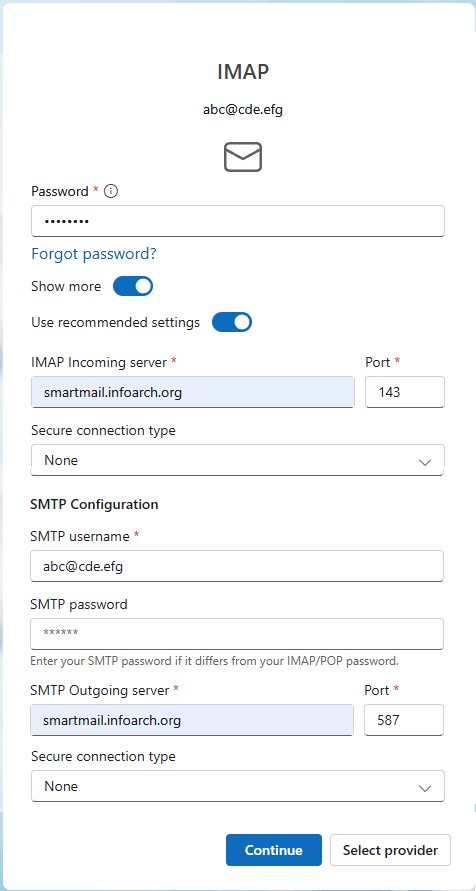
If IMAP setup fails
Do not disable encryption. Recheck the issued settings and confirm that Microsoft Cloud sync is approved.
1. Recheck the issued encrypted IMAP port
2. Recheck the issued encrypted IMAP connection type; never select “None”
3. Recheck the issued encrypted SMTP connection type; never select “None”
After confirming the issued encrypted settings and organisational approval, click “Continue” to sync with Microsoft Cloud.
Mobile guide
Apple Mail on iPhone
Add an IMAP mailbox to the built-in Mail app using your incoming and outgoing server details.
iOS8 steps · 7 screenshots
Settings vary by mailbox
Use the exact server names, ports, encryption options and credentials issued for your account. Screenshot values are illustrative.
Before you beginAccount details checklist
You should have the following information available:
Use your mailbox settingsThe values below are provider-neutral examples. Use only the server names, encrypted ports and security options issued by Infoarch or your email administrator; never select “None”.
Your...
Example...
Display Name
Example User
Email address
user@example.com
Email account username
Issued username
Email account password
Not shown
POP3 Server
pop.example.com
POP3 Port
Use the encrypted port issued for this mailbox
SMTP Server
smtp.example.com
SMTP Port
Use the encrypted port issued for this mailbox
IMAP Server
imap.example.com
IMAP Port
Use the encrypted port issued for this mailbox
Configure (Setup)iPhone Account
Step 1:
Go to 'Settings'
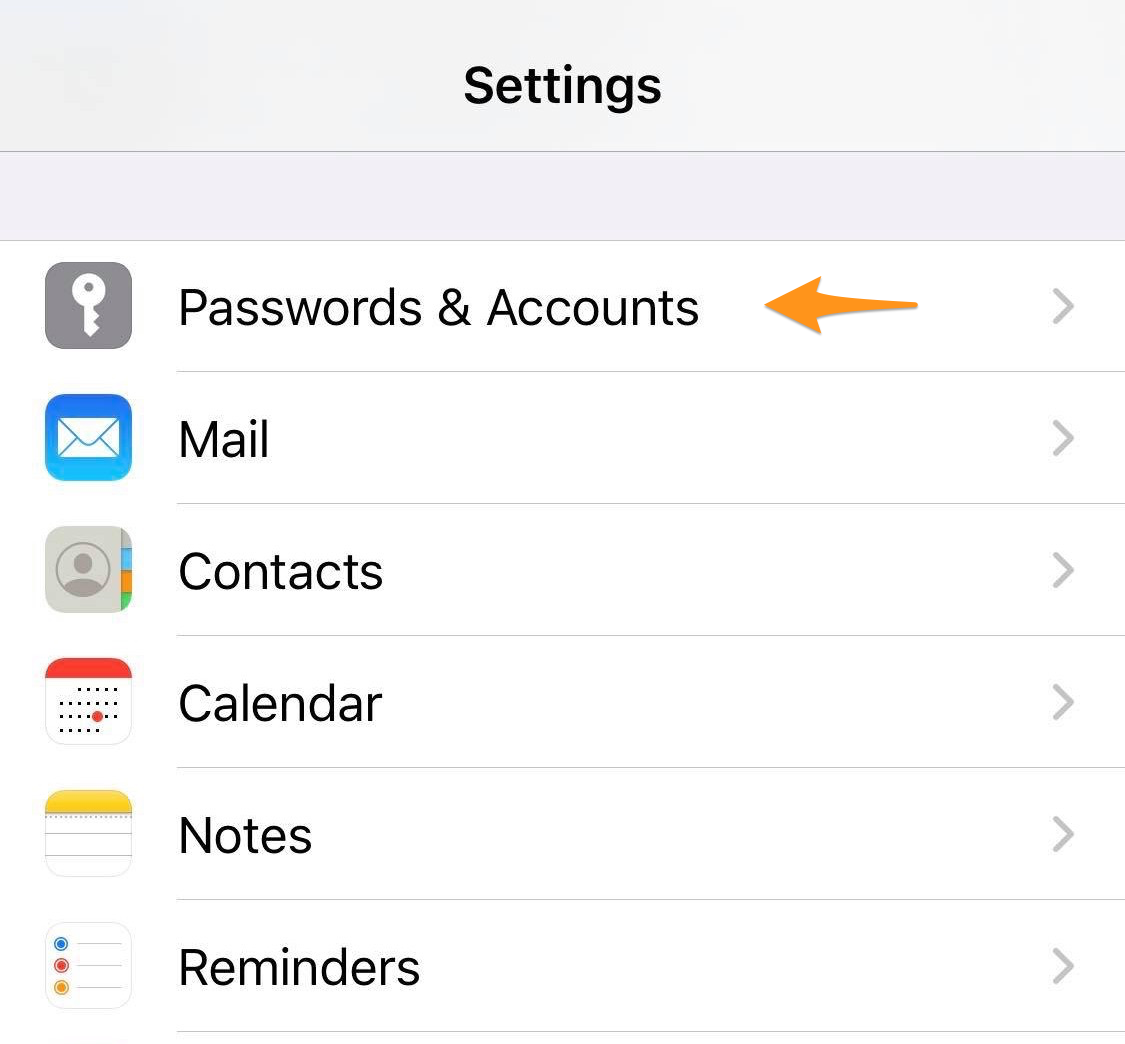
Step 2:
Tap "Password & Accounts"
Step 3:
Tap 'Add Account'
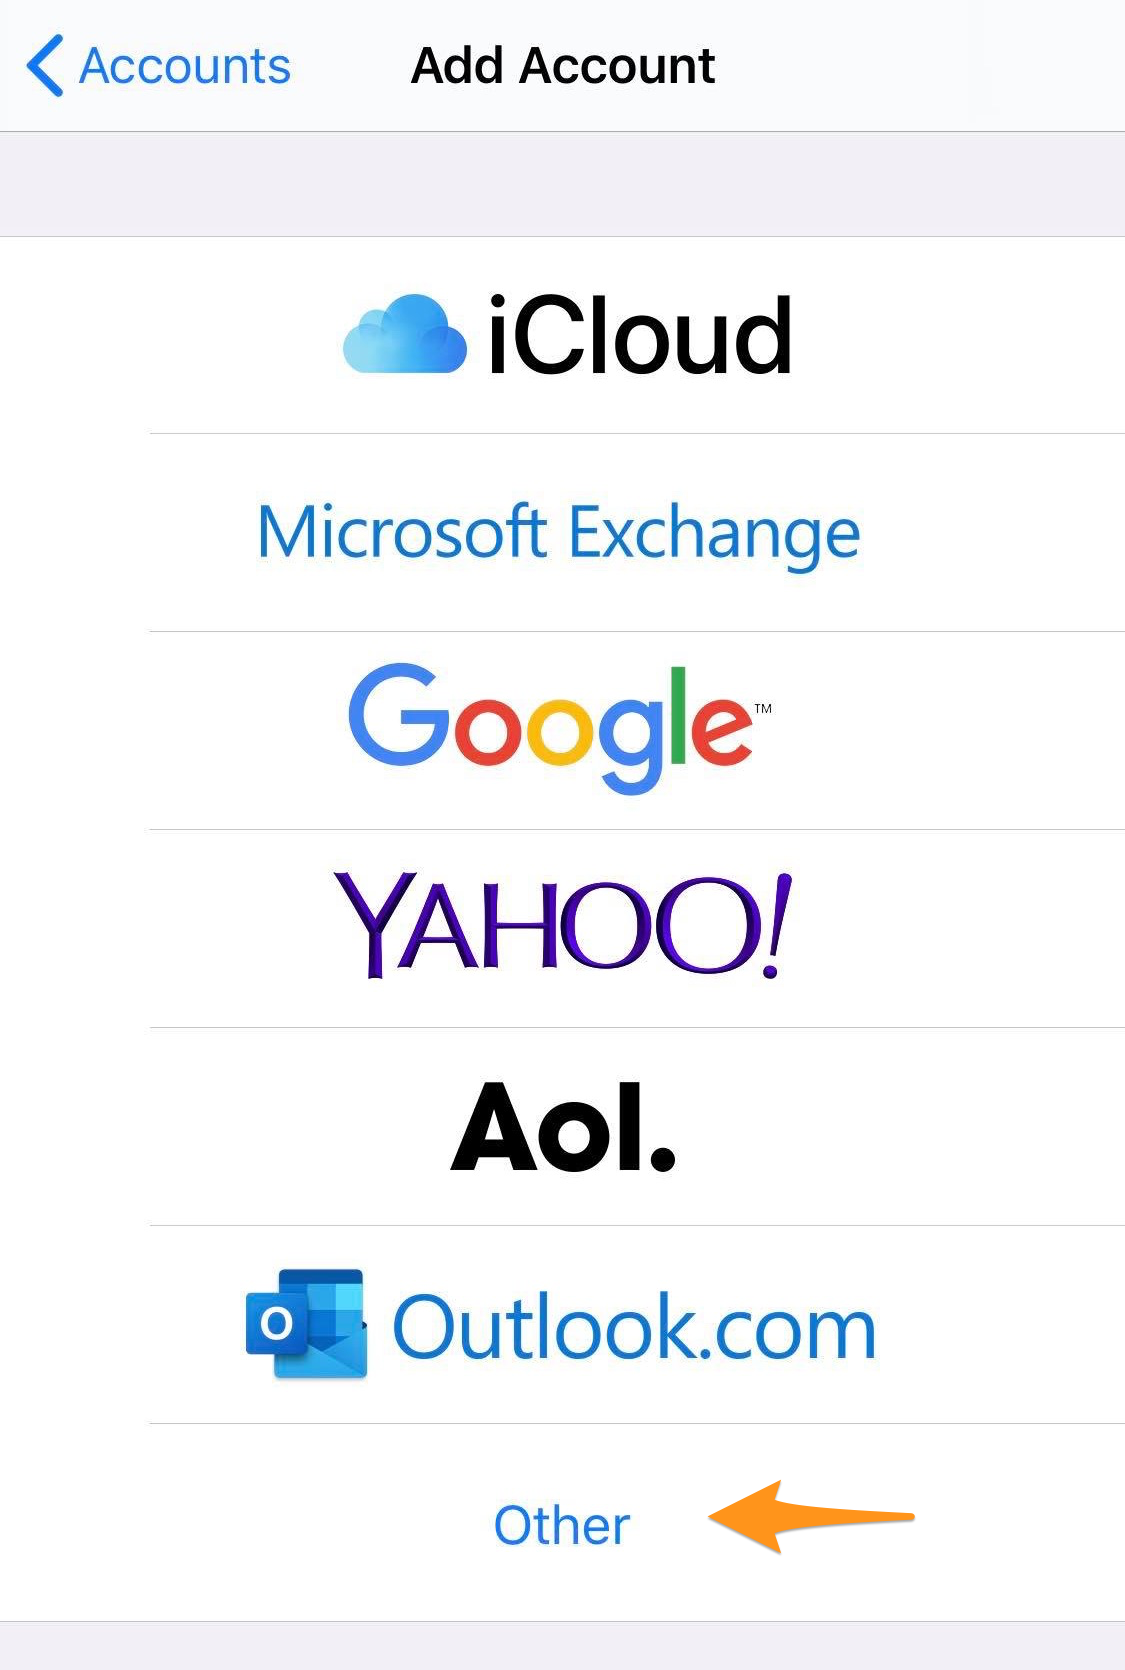
Step 4:
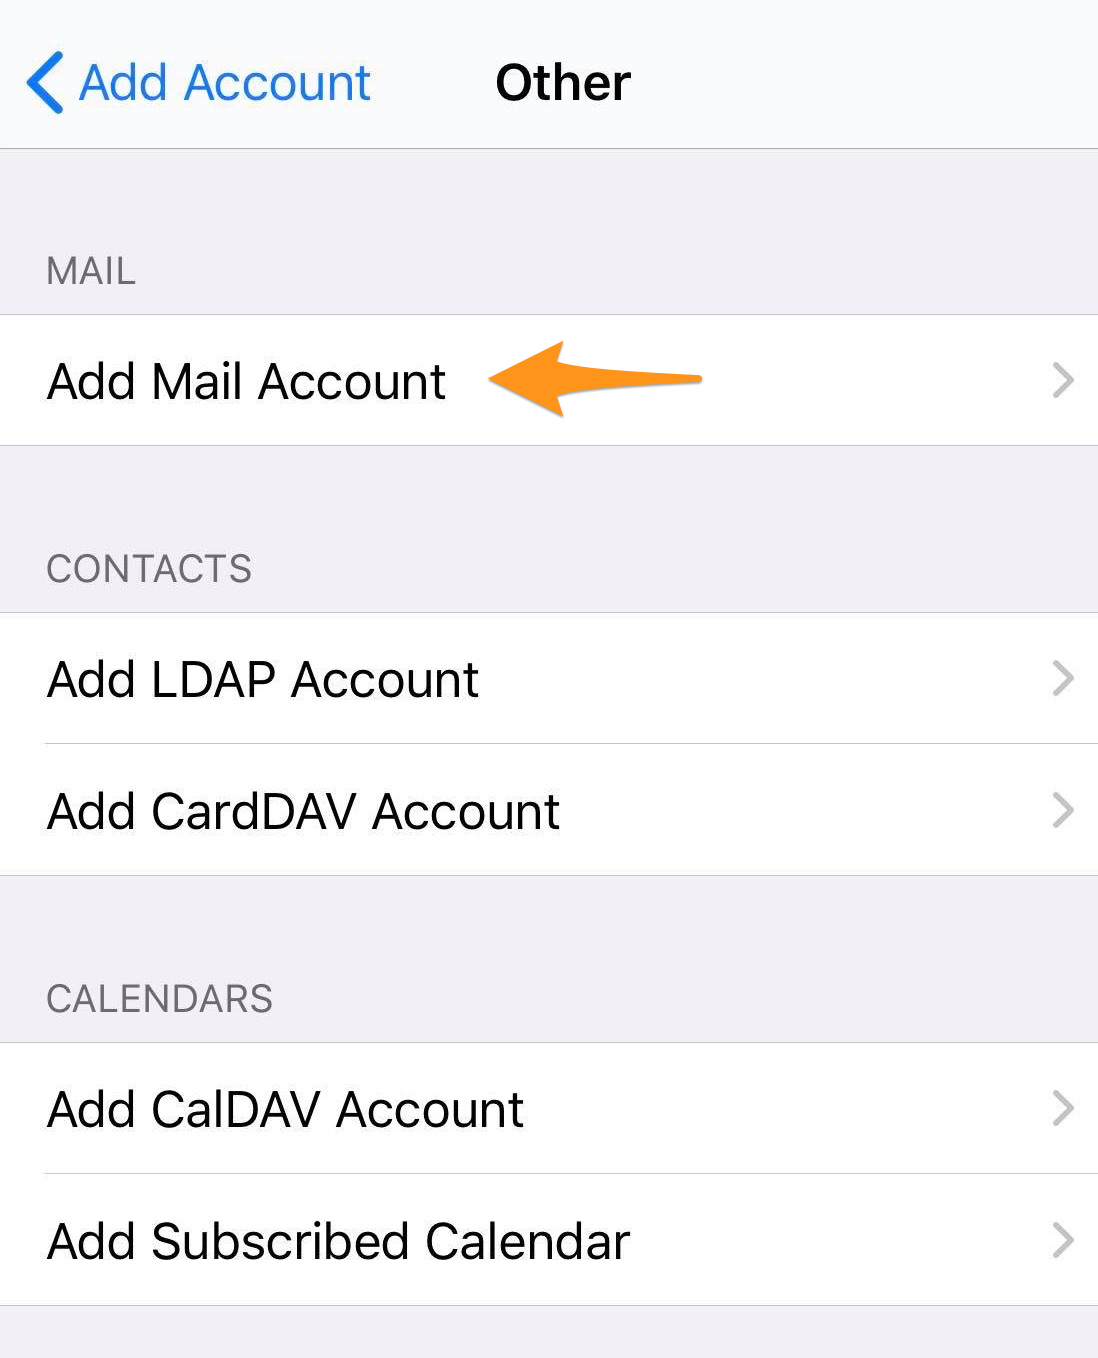
Tap 'Other'
Step 5:
Tap 'Add Mail Account'
Step 6:
Enter your email address and password , then tap 'Next'
Step 7:
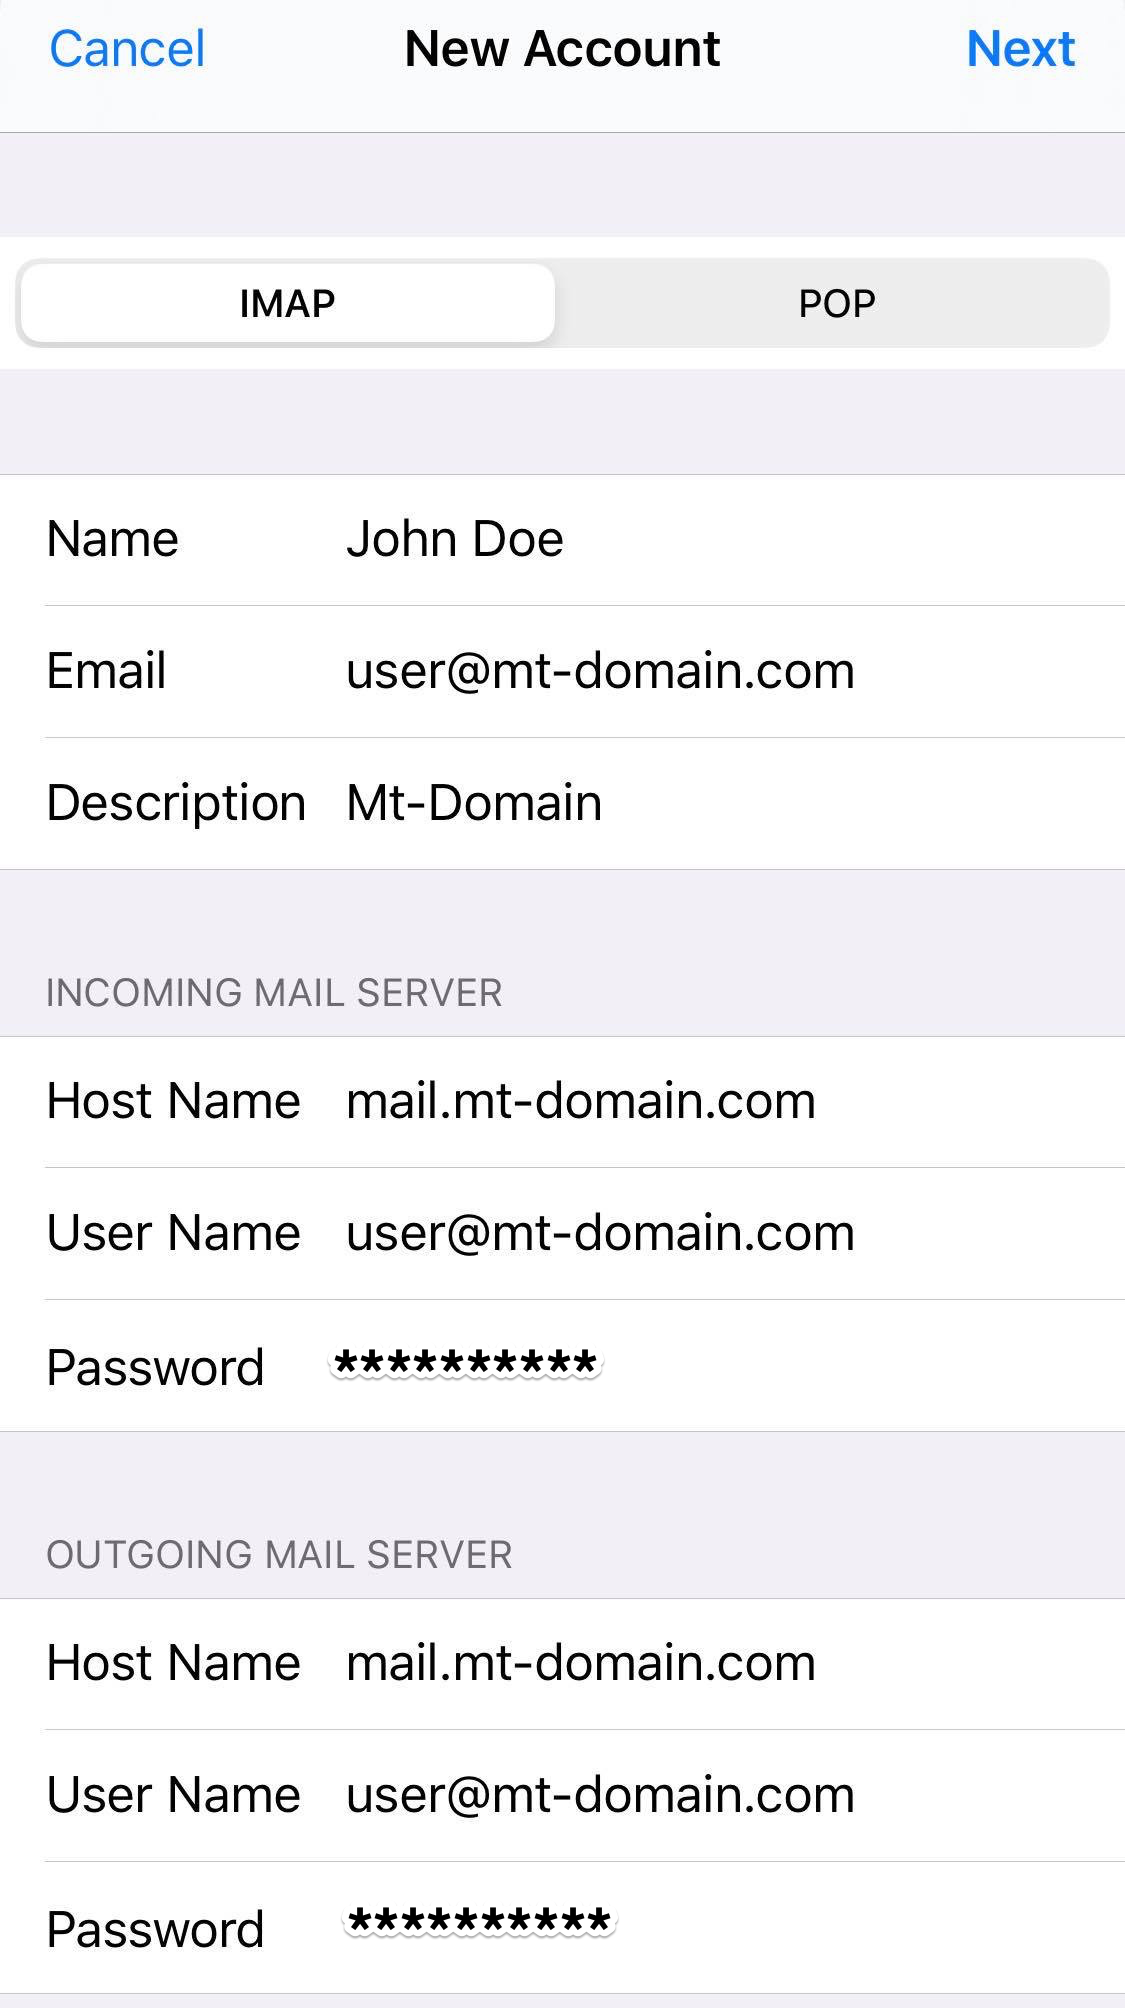
Tap 'IMAP', then type the issued server names, email address and password for both incoming and outgoing mail. Before saving, confirm that both encrypted connection types and ports match the issued settings. Never accept an unexpected certificate warning.
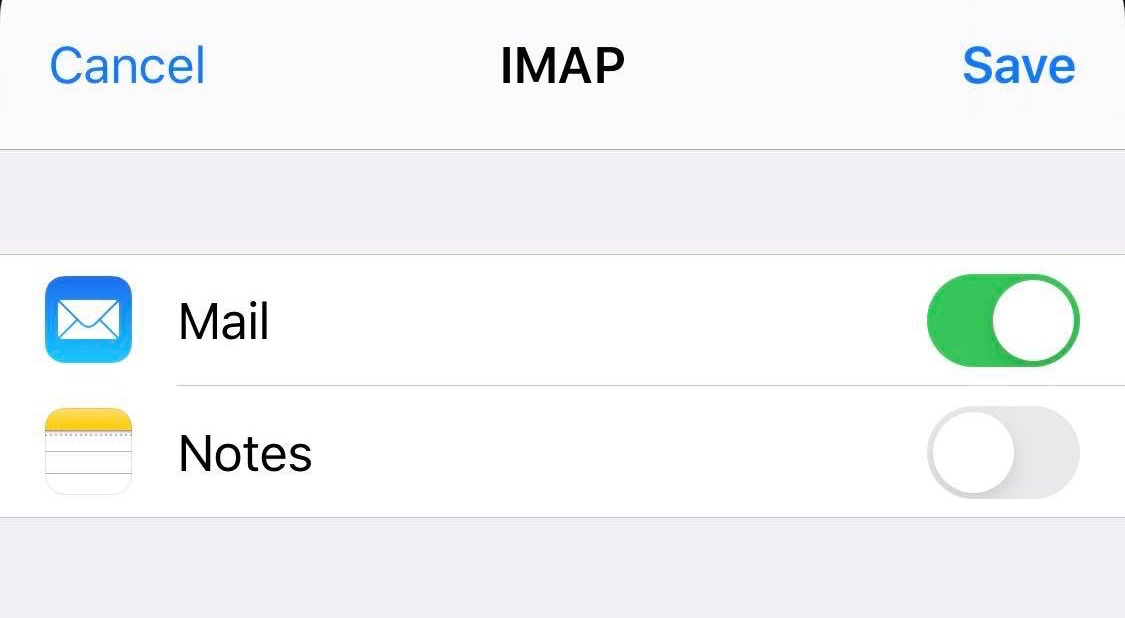
Step 8:
Tap 'Save'
Mobile guide
Android Mail
Add an IMAP mailbox to the default Android mail app and confirm outgoing authentication.
Android6 steps · 5 screenshots
Settings vary by mailbox
Use the exact server names, ports, encryption options and credentials issued for your account. Screenshot values are illustrative.
Before you beginAccount details checklist
You should have the following information available:
Use your mailbox settingsThe values below are provider-neutral examples. Use only the server names, encrypted ports and security options issued by Infoarch or your email administrator; never select “None”.
Your...
Example...
Display Name
Example User
Email address
user@example.com
Email account username
Issued username
Email account password
Not shown
POP3 Server
pop.example.com
POP3 Port
Use the encrypted port issued for this mailbox
SMTP Server
smtp.example.com
SMTP Port
Use the encrypted port issued for this mailbox
IMAP Server
imap.example.com
IMAP Port
Use the encrypted port issued for this mailbox
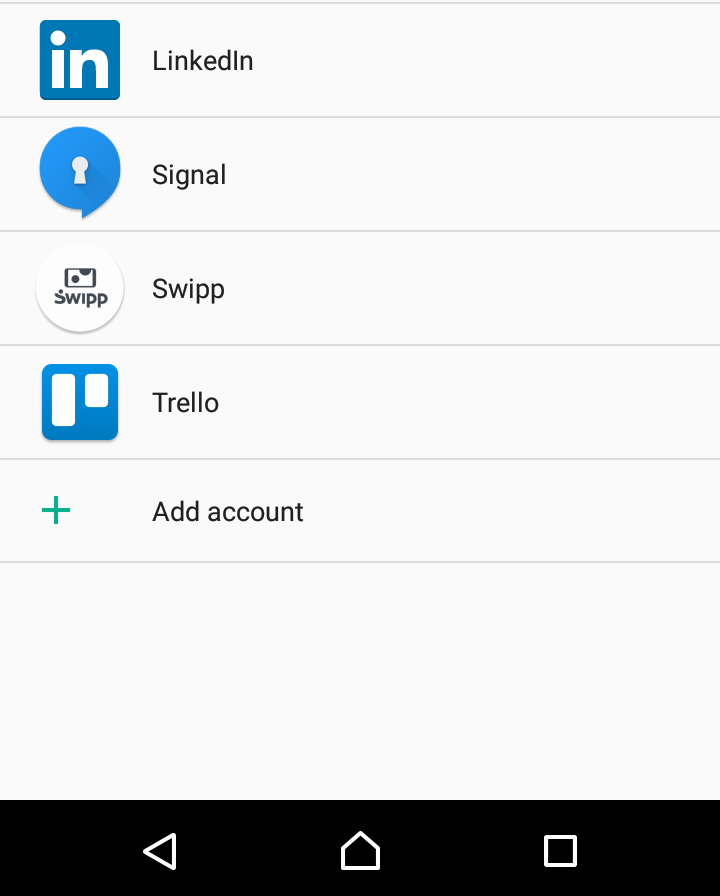
Step 1:
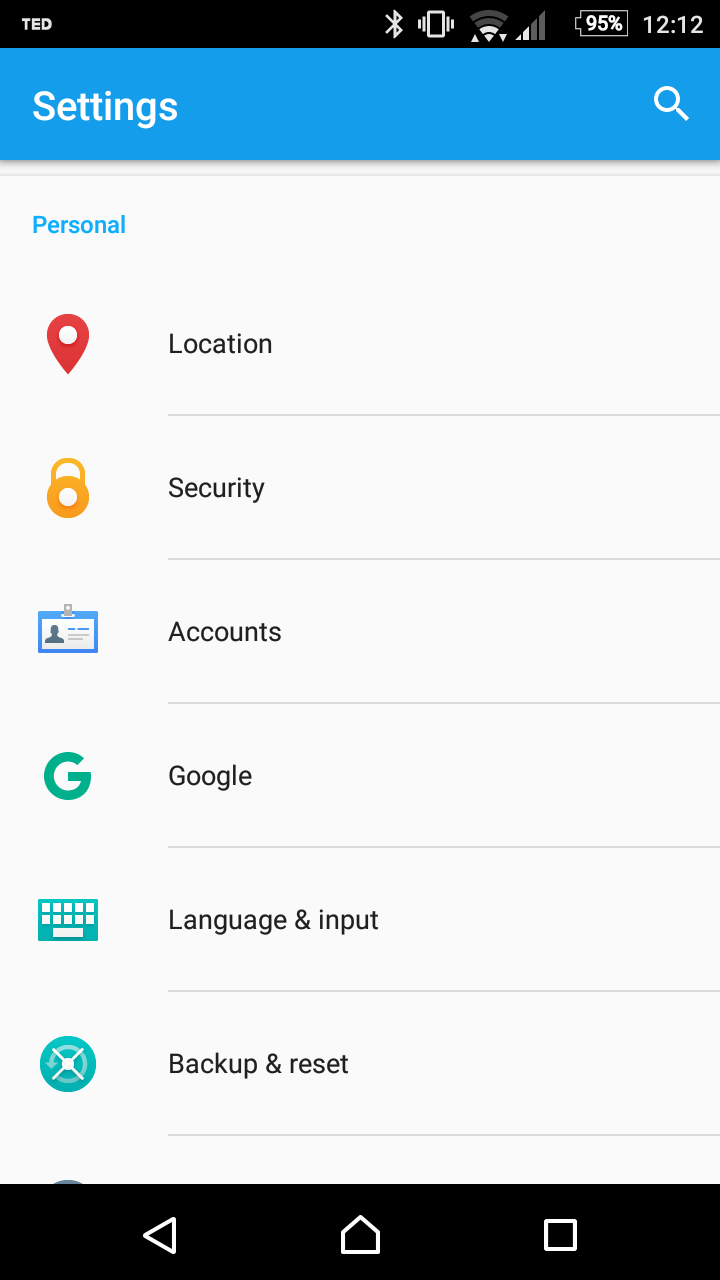
Go to 'Settings' and tap 'Accounts'
Step 2:
Tap "Add Account"
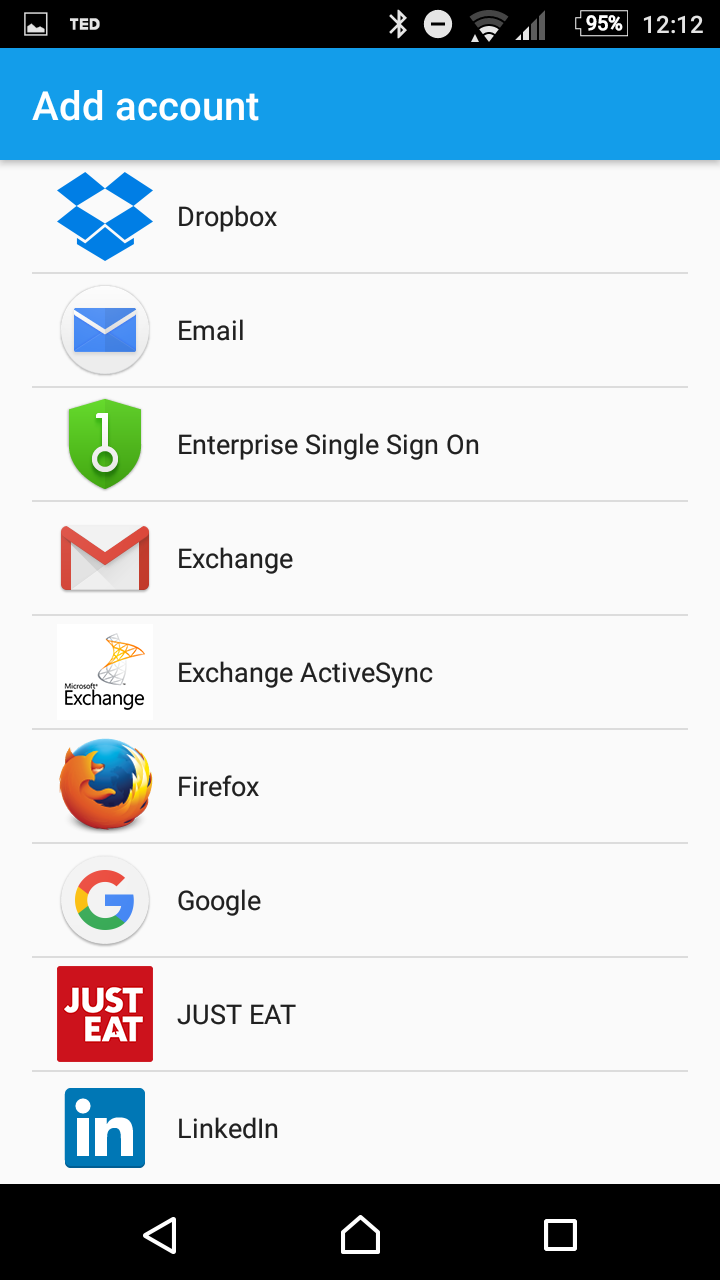
Step 3:
Tap the 'Email' icon
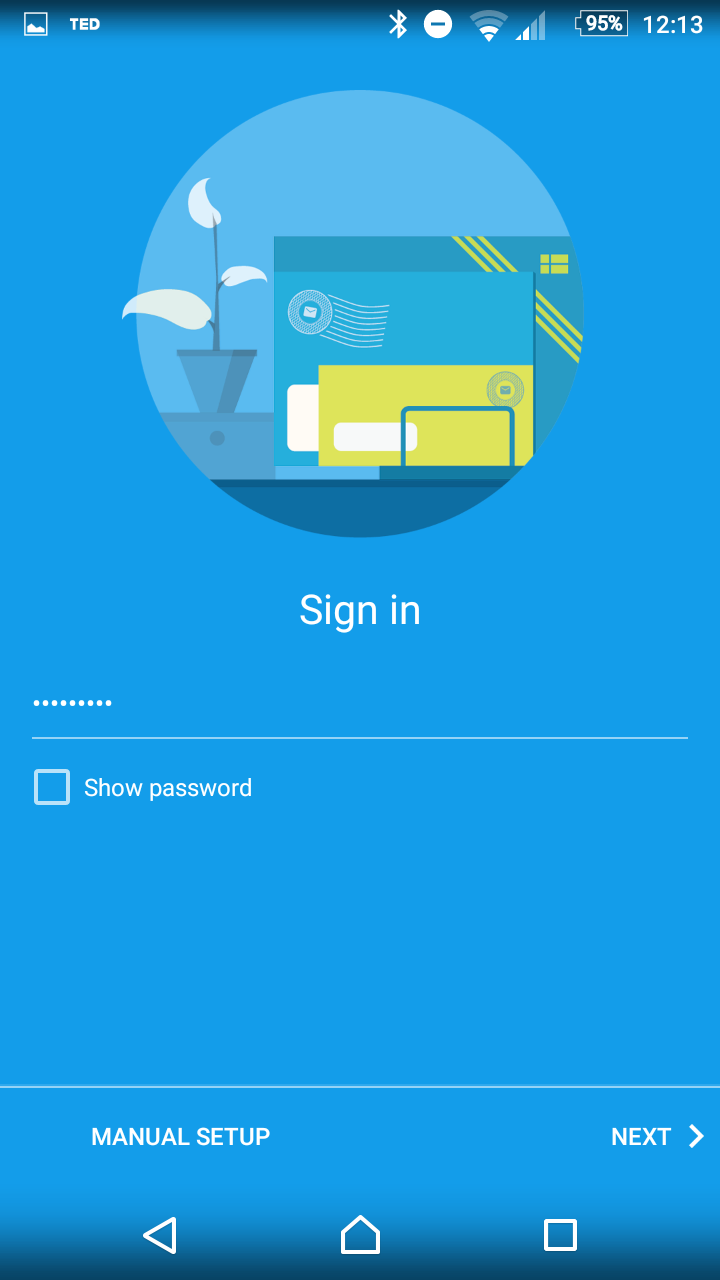
Step 4:
Enter your email address and password, then tap 'Next >'
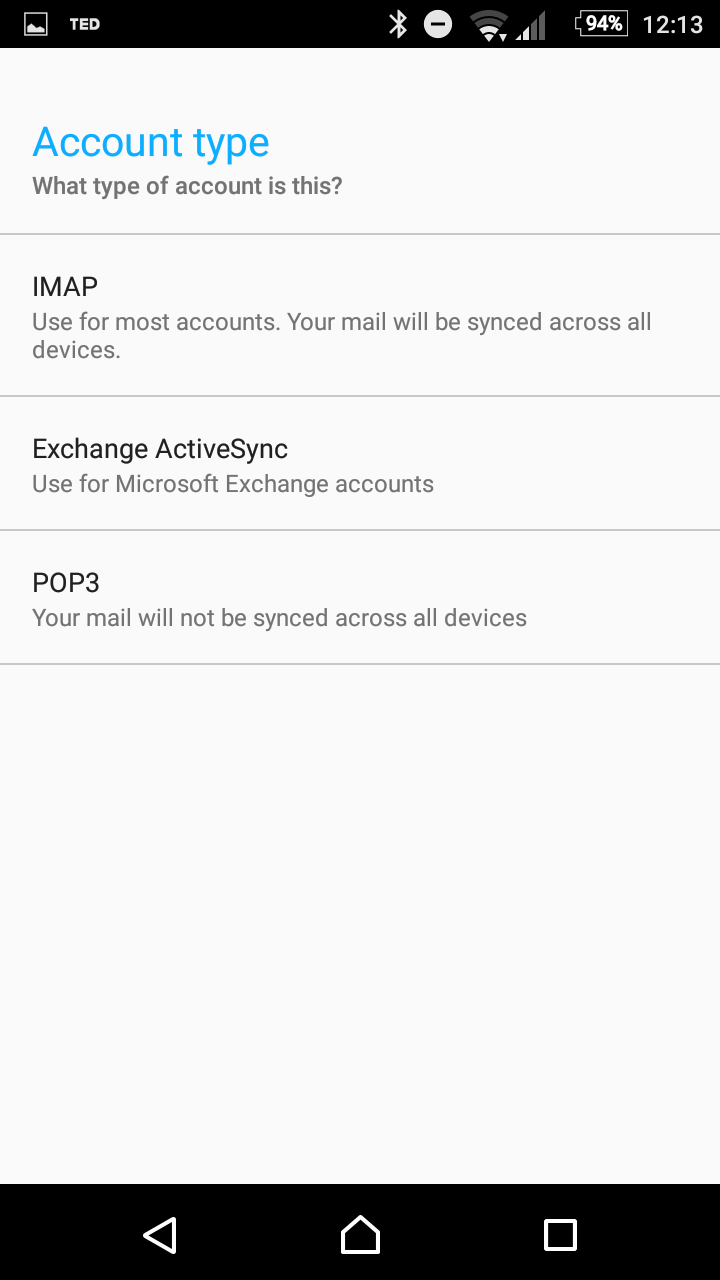
Step 5:
Choose 'IMAP'
Step 6:
Verify your email address, enter the issued IMAP server and tap 'Next >'. Enter the issued SMTP server, then enable "Require Sign-in". Before finishing, confirm that incoming and outgoing encryption and ports match the issued settings. Never accept an unexpected certificate warning.
Connection support
Email troubleshooting
Start with the checks that solve most connection problems, then consult the legacy archive only for older mail software and services.
SupportPractical first checks
Start here
Six checks before changing anything
Confirm your connection.Open a trusted website to make sure the device is online.
Re-enter the password safely.Use only the official app or account settings; never send a password or authentication code to support.
Compare every setting.Use the incoming and outgoing values issued for this specific mailbox.
Check outgoing authentication.SMTP commonly needs authentication even when receiving works.
Review security options.Ports and encryption must match the settings supplied by your administrator.
Test another trusted network.Avoid open or public Wi-Fi while entering mailbox credentials.
Protect your local mail
Back up important messages before renaming folders, removing profiles or deleting mail-client data files. Contact support if you are unsure.
Older systemsOpen the legacy troubleshooting archiveOutlook Express, dial-up, ISDN and historic ISP notes
Legacy reference
This material includes observations from 2006–2008 and applies to discontinued software or services. It is retained for reference, not as current service-status guidance.
Navigate to:
Top Issues
Every month we receive problem reports that help us identify a trend in email usage. The top issues are listed here, as this is likely the issues that you are most likely to encounter.
1.1 - Outlook Express no longer send/recieve
You start to encounter error in Outlook Express telling you that there it can not send or receive emails, despite having been using your Outlook Express for quite some time, receiving and sending emails regularly.
This usually happens after a period of time where Outlook Express seems to be synchronizing with the mail server, you may even manage to download a few emails before this happen.
It is likely that your Outlook Express mailbox is full. While our server will continue to receive emails for you, you can no longer send or receive because there is no room in your local Outlook Express to add those information.
The file size limit of 2GB is effectively your mailbox size limit.
To verify if this is the case,
- Open Outook Express, select Tools - Options - Maintenance
- Click the Store Folder... button, and copy the path down
- Click Windows Start and select the Run... command - Paste the path into the "Open:" textbox, click the Ok button
If the file exceeds 2GB (2,000MB), close Outlook Express and make a verified backup before changing anything. Rename rather than delete the data folder, and use this archive procedure only on a copy of the data.
1.2 - Outlook no longer send/recieve
some version of Outlook behaves similarly to Outlook Express (see above) in the 2GB file size limit. Although you can choose to compress the mail folder to delay it slightly, or enable the auto archive funtion to workaround the file size limit.
To verify if your file has reach the size limit,
- Open Outook, select Tools - Options - Mail Setup
- Click the Data Files... button, double click the default Personal Folder
- Copy the "Filename" location (note the "Compact Now" button, which you may need to click later).
- Click Windows Start and select the Run... command - Paste the path into the "Open:" textbox, click the Ok button
Note the file size, if it exceeds 2GB (or 2,000MB), then you will need to take action. Simplest and quickest of which is to delete away unwanted emails, and compact your Personal Folder.
Modem Issues
Successful sending and receiving of emails depend on valid and reliable Internet connection. If that connection is broken, all pending Internet communications, including incoming and outgoing emails, will be interrupted.
If you use a dial-up modem to connect to the Internet, you may encounter the following errors...
2.1 - Modem is not dialing out
a. Check the phone line to see that there is a valid dial-tone, sometimes it is due to faulty cable or loosed socket. In some extreme cases such as during severe thunderstorm, the line between you and the telephone company's exchange may be flooded, in which case you will have to contact your telephone company to resolve the issue.
b. You may have accidentally erased the phone number, verify that the number that you are dialing out is valid.
2.2 - Busy Signal
Busy signals are caused by the phone company or your ISP's inability to handle customer demand. It usually happens during congested hours.
2.3 - Unanswered Call
Unanswered calls are caused by the ISP's phone company, which provides the dial-in lines, or your ISP, which hosts the equipments to receive your call. It usually happens during congested hours, but can be due to your location as well; there are some places in Johor where your dial-out will be unanswered 90% of the time. Contact your ISP for help, or change your ISP.
2.4 - Call Interrupted / Dropped
Dropped calls are caused by your phone company, the ISP's phone company, or your ISP. It usually happens during congested hours.
2.5 - Slow Connection
It normally happens during congested hours and is due to your ISP's inability to handle demand; if it consistently happens outside of the congested hours, it is either due to your phone company's equipments, or the cable quality between your site and your phone company's exchange.
Please note that from time to time your ISP may perform equipment upgrades, which can slow down international Internet traffic significantly for a short period of time.
2.6 - ISDN Connection Issues
Establishing an Internet connection via ISDN is almost instantaneous, most ISDN issues are having to do with network congestion, with authentication error being the most frequently encountered problem.
At any rate, it may please you to note that ISDN lines are considered "premium" by Telekom Malaysia, and they will usually resolve most issues within two days.
Update September 2006: ISDN line supports have all but evaporated in Johor Bahru. The local Telekom Malayisa's technicians simply do not understand ISDN technology. Expect more down time as compare to ADSL.
Update January 2008: The preferred connection is now SDSL.
2.7 - ADSL Connection Issues
Once properly configured, any connectivity issue is usually only temporary, lasting between 15 minutes to 3 hours.
With Telekom's aggressive promotional campaign, ADSL quality is spotty. If you experience ADSL down time of more than 1 hour, you should contact your ISP immediately. ISP response time usually ranges from 1 day to 2 weeks, sometimes never.
Update December 2007: Telekom tech support now forces you to go through a scripted routine if you call to complain about problem. If you do not go through these steps, you can not lodge a case. If you go through with it and get a case number, they will send a technician to provide on-site examination. If the problem doesn't appear when the technician arrives, the case will be closed with you being the cause of the problem and you will be billed RM50.
2.8 - Authentication Failed
Even after your modem has successfully dial-up, your ISP my disconnect you for failing to authenticate.
a. Verify the user ID only in the official account settings. Do not share credentials; use delegated or separate accounts, and reset any password that was previously shared.
b. If you use TMNet pre-paid or Jaring Top-up accounts, ensure that your account still has sufficient credit.
c. It can be due to your ISP's authentication server temporarily unreachable, either due to network congestion or server down. Try again later.
Email
If you have successfully established and maintained a reliable connection to the Internet, but still encountered problem with the sending or receiving of emails, it may be due to one or more of the followings...
3.1 - Can't Receive Emails
99.9% of the time it is due to wrong email address that the sender used to send email to you. Make sure that:
a. You gave the correct email address to the sender
b. The email sender did not mistype your email address
c. You did configure your email account with the correct reply address
3.2 - Emails sent to you were rejected
It could be due to: wrong email address, false-positive spam filter
a. Wrong email address : this is usually the case if the email was bounced back to the sender saying that the receipient doesn't exist, or the server has problem resolving the MX/A record, or the email simply can't be delivered because the server can not resolve the address due to wrong domain name or incorrect address format. Most usually the email address was keyed in incorrectly. Provide the correct email address to the sender, and make sure that the entire address is typed in.; do not rely on the "recall" function of the email client, as most email clients might remember the wrong email address.
b. False-positive spam : the sender might have composed the email in such a way that it is somehow identified as spam. Advice the sender the phrase it differently, and/or change the email to plain-text. This error is most common during severe spam storm, when we have to raise the filter sensitivity to cope.
3.3 - Can't Retrieve (Download) Emails
It could be due to: large emails, Internet congestion, wrong email client configuration or email server temporary unavailable.
a. Large Emails : there could be one or more emails in your mail box that are too large and takes more than a few minutes to be downloaded. For example, under the best condition, a ten megabyte file takes about thirty minutes to be downloaded over dial-up line. You may want to consider using the supplied webmail client to view the subject and decide if the email is worth downloading or should be deleted straight away.
b. Congestion : if the traffic is congested, the same ten megabyte file can take four times as long (more than two hours) to be downloaded. Worst yet, you may be disconnected half way during download. So the best cause of action is to try again at a later time.
c. If you have configured your email client properly, you should copy down the error message and contact your email account administrator.
d. The email server may be temporarily unreachable. You should try again at a later time.
3.4 - Can't Send Emails
It could be due to large attachment, wrong email client configuration, or your email server requiring you to provide password to send email. Check your email client configuration to ensure that you have enable "SMTP (outgoing) Server" to use authentication, and that you are using the correct port number.
3.5 - Emails Bounced
If you receive an email from the automatic responder of your email provider, saying that it failed to deliver your email for you, this email is "bounced", which can be due to one or more of the following reasons:
a. Mistyped email address. Verify with the email recipient that the email address you use is EXACTLY the same as intended.
b. Mail box doesn't exist. The recipient has moved on and his/her account has been removed, or the recipient has just joined the new domain and his/her account has not been activated yet.
c. Mail server temporarily unreachable. Email systems are not 100% reliable: the receipient's server can be offline or the network can become congested. Under normal circumstances the sending email server will attempt delivery at a later time, and in rare situation, these subsequent"resending" of emails can still result in failure and your emails "bounced". You should try sending the email again.
d. Viruses and spammers can send emails from other infected/controlled systems and make them appear to originate from you. There is nothing you can do unless those systems are yours, in which case you should clear the systems of any malwares.
a. The nature of emails POP is such that the server will only set the email status as "downloaded" AFTER you've download them all. So if the email retrieving process is interrupted for any reason, your email client will restart downloading your emails from the very beginning, including those emails that have already been successfully retrieved. The interruption is usually due to large email attachment(s) or malformed emails.
b. The sender may have sent multiple emails to you. This could be due to the senders listing your email address twice as the recipient, or the sender simply sent multiple copies of the same emails to you to enhance the chance of you receiving and reading the email. In some countries this behavior is consider SPAM, in some others it is called 'Kiasu'. Talk to the sender.
c. Your email client index files can become corrupted for a variety of reasons. If it's Outlook Express, file corruptions can be the reason that the same emails are being downloaded repeatedly. (check section 5: Congested Hours)
Emails are typically sent via SMTP. The server will send an acknowledgement to your email client for each email successfully received by the server. If that acknowledgement is not send by the server due to server problem, or not received by your email client due to network, corrupted email composition or other client problems; that email remains in your outbox and is not considered sent. Your client will keep sending whatever emails that are in your outbox. Manually removing it from the outbox will solve this problem.
3.8 - SPAM Filter
An average email user in the United States spent between half-hour to two hours cleaning the inbox of unwanted junk emails*. Most ISPs now offer SPAM filtering technology to combat SPAM, usually with mixed result, either accidentally removing legitimate emails or letting too much SPAM filtering through.
Our SPAM filter is active/passive: obvious spams are rejected. For emails received, a special ascii graphical header is added to suspicious emails, and the message subject is prefixed with the tag "[SPAM]". Users can easily configure their email client to move all emails to a temporary folder
* Statistically, for every 5 good emails that you received, you would also receive 1 suspected spam and 1 actual spam. You would not recieve 68 actual spams/viruses that were rejected outright. The statistic varies depending on your email usage behavior.
When you connect to your Internet service provider (ISP) to retrieve messages from a Post Office Protocol 3 (POP3) server, your password is not retained even though you chose to save the password. Attempts to reenter the correct password fail to resolve the behavior.
3.10 - Backing up Outlook Express data
How to back up and restore your messages, Address Book, mail accounts, and news accounts in Outlook Express 5 and later.
3.11 - Recommended Email Client
Use a vendor-supported mail app that receives current security updates.
Outlook Express Error
Most Windows users use Outlook Express as the default email client.
4.1 - List of Common Outlook Express Errors
If you receive any of the following error codes, the problem may be related to your ISP or the Internet, and may be only temporarily. You should try again at a later time.
Error Code
Description
0x800CCC0A
Message download incomplete
0x800CCC0B
Server or maildrop is busy
0x800CCC0D
Cannot find server
0x800CCC0E
Cannot connect to server
0x800CCC0F
Connection dropped
0x800CCC19
Connection timeout
0x800CCC97
POP3 message ID out of range
If you receive the following error codes, your mail box configuration may be incorrect. You should refer to your e-mail account information provided by your ISP to rectify any incorrect settings.
Error Code
Description
0x800CCC10
Address not known on server
0x800CCC16
User account not recognized
0x800CCC18
Logon attempt failed
0x800CCC1A
Unable to connect using SSL
0x800CCC60
Invalid SMTP response
0x800CCC6F
SMTP transaction failed
0x800CCC78
Unknown SMTP sender. This is caused by having the incorrect e-mail address in the Reply-To field
0x800CCC79
Server rejected recipients
0x800CCC90
Client response invalid
0x800CCC91
Invalid user name or user not found
0x800CCC92
Password not valid for account
The following error codes are problems relating to your e-mail client or certain missing information. Simply ensure that you have supplied all the necessary information.
Error Code
Description
0x800CCC7A
No sender address specified
0x800CCC7B
No recipients specified
4.2 - OE repeatedly download the same emails
If a POP3 account repeatedly downloads the same messages, a damaged "Pop3uidl.dbx" index may be involved. Close Outlook Express and make a verified backup first. Rename the file instead of deleting it so the change is reversible. The next check may download every message still on the server, so confirm server retention and available storage before proceeding.
Congested Hours
The incumbent ISPs in Malaysia are TMNet and Jaring. Follows are the network congested hours provided as a rough indication for Southern Johor region only, and is heavily dependant on your actual physical location. For example, even though TMNet has a dial-up node in Kulai, Kulai is severely affected by evening peak hours.
5.1 - TMNet Congested Hours
If you are TMNet subscriber, you are likely to encounter connection problem during certain hours; we have tabulated those hours in the following table for your reference (Monday to Friday) :
Start
End
Failure Rate (5 min)
12:00AM
12:59AM
50% - 80%
1:00AM
1:59AM
2:00AM
2:59AM
50% - 80%
3:00AM
3:59AM
4:00AM
4:59AM
50% - 80%
5:00AM
5:59AM
6:00AM
6:59AM
7:00AM
7:59AM
8:00AM
8:59AM
80% - 99%
9:00AM
9:59AM
10:00AM
10:59AM
60% - 90%
11:00AM
11:59AM
50% - 80%
12:00PM
12:59PM
50% - 80%
1:00PM
1:59PM
2:00PM
2:59PM
60% - 90%
3:00PM
3:59PM
4:00PM
4:59PM
5:00PM
5:59PM
60% - 90%
6:00PM
6:59PM
7:00PM
7:59PM
8:00PM
8:59PM
20% - 50%
9:00PM
9:59PM
60% - 90%
10:00PM
10:59PM
80% - 99%
11:00PM
11:59PM
20% - 50%
The failure rate column shows the probability of you encountering a problem if you stay connected for five minutes or beyond; a number of 80% means that statistically, every 8 out of 10 connection attempts are problematic (Note that even after you have successfully dial-in to TMNet, the longer you stay on line, the higher the chances of you getting disconnected).
5.2 - Jaring Congested Hours
If you are Jaring subscriber, you should be glad to know that the network is much better managed, and the likelihood of you encountering difficulty is lower :
Start
End
Failure Rate (5 min)
12:00AM
12:59AM
1:00AM
1:59AM
2:00AM
2:59AM
3:00AM
3:59AM
4:00AM
4:59AM
5:00AM
5:59AM
6:00AM
6:59AM
7:00AM
7:59AM
8:00AM
8:59AM
9:00AM
9:59AM
10:00AM
10:59AM
60% - 90%
11:00AM
11:59AM
12:00PM
12:59PM
50% - 80%
1:00PM
1:59PM
2:00PM
2:59PM
3:00PM
3:59PM
4:00PM
4:59PM
5:00PM
5:59PM
6:00PM
6:59PM
7:00PM
7:59PM
8:00PM
8:59PM
50% - 80%
9:00PM
9:59PM
60% - 90%
10:00PM
10:59PM
80% - 99%
11:00PM
11:59PM
The failure rate column shows the probability of you encountering a problem if you stay connected for five minutes or beyond; a number of 80% means that statistically, every 8 out of 10 connection attempts are problematic (Note that even after you have successfully dial-in to Jaring, the longer you stay on line, the higher the chances of you getting disconnected).
Need a hand?
Still unable to send or receive email?
Share the app and exact error text, but do not include passwords, authentication or recovery codes, or unredacted screenshots containing mailbox details. Our team can help identify the next practical step.